We aim to be an exclusive trainer for each squash fan.
We will explain how to use it step by step.
Startup screen
First, select from two types of screen display methods.
- Flash On
- Flash Off
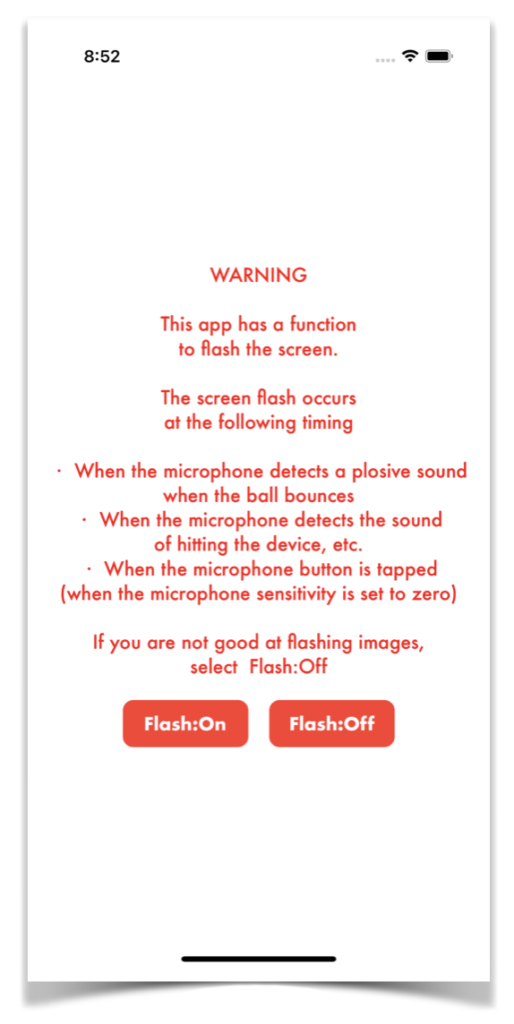
The app detects loud sounds generated by a ball hit on the court hitting the front wall through a microphone.
The ghost is moved at the timing when it is detected, and the screen is flashed for a moment according to it.
This is intended to clearly inform the user that the ghost has moved, but it can be too flashy and annoying.
Therefore, the user can select whether or not to use this flash.
Even after setting once, tap the “Back” button on the main screen to return to the “startup screen”, so you can change the settings.
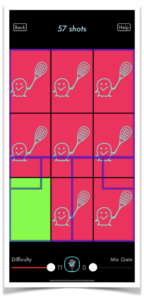
Next is the main screen.
Interpret the area shown in green on this main screen as the area where you should hit a shot on a real court.
Of course, follow the squash rules and aim for one or two bounces in the green area after hitting the front wall.
In the area shown in red, the ghost is fully defending, and even if you shoot a shot there, it will be returned with an easy victory (= winning shot presentation).
Please see below for the relationship with each line of the court.
There are two user-adjustable items on the main screen.
- Difficulty
- Microphone gain
- Difficulty
At the bottom left of the screen, there is a notation “Difficulty” and something like a slide volume nearby.
As soon as you drag the round part, the value on the right side changes.
There are 11 types of numbers from 1 to 11.
・ 1 ~ 8: The number of ghosts is 1 ~ 8 *
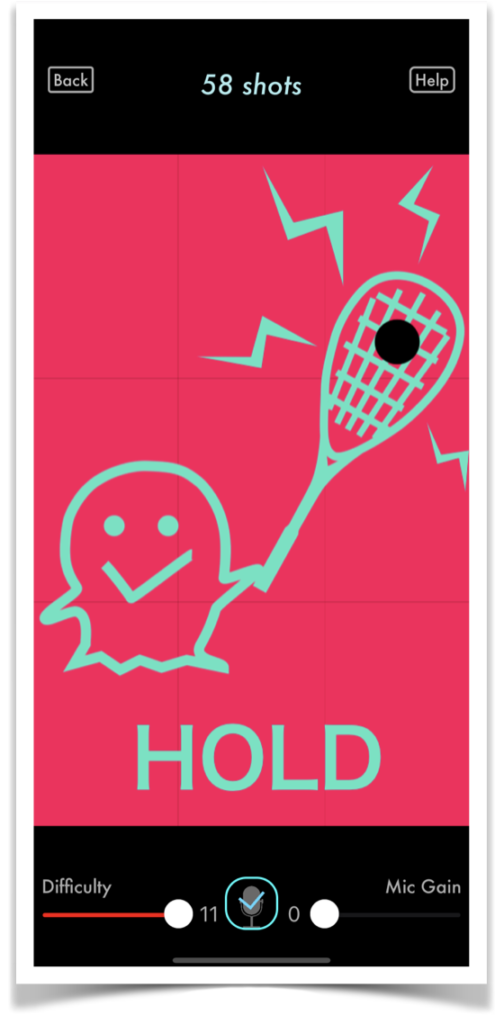
・ 9 ~ 11: The number of ghosts is fixed at 8. The timing until the ghost position is displayed is different.
・9: Short
・10: Medium
・11: Long
The larger the number of ghosts, the wider the range of ghosts painted in red, and conversely the green “area to aim for” becomes narrower. This means that it will be more difficult.
Also, the longer the timing to display the position of the ghost, the shorter the time to decide the course of the shot, so the difficulty increases.
The following HOLD screen is displayed during this timing.
*: Apology: The light version is free of charge by limiting the number of ghosts to “1”.
- see above
- Microphone gain
At the bottom right of the screen, there is a notation “Mic Gain” and something like a slide volume nearby.
As soon as you drag the round part, the value on the left side changes.
Numerical values range from 0 to 10
0: No microphone sensitivity
1-10: With microphone sensitivity
If it is 0, the microphone does not detect loud sounds.
Instead, the microphone image in the bottom center becomes a tappable button.
By tapping this button, it works in the same way as when a loud sound is detected.
Please use it when you want to see what kind of defense system the ghost can take.
A clap sound will be heard according to the button tap.
1 to 10 means low to high microphone sensitivity.
At the beginning of use, set it to a high “10” and try the shot.
It is best to move the ghost only at the timing of your own shot.
If the ghost moves even with sounds other than your own shot, gradually adjust it to the lower side.
Please note that if you set it lower than necessary, it will be difficult to react to your own shots.
If set to 0, the short line, half court line, and service box on the court floor will be displayed in an overlapping manner.
This display disappears when you tap the microphone button
others
In addition, the main screen has the following items.
Shot count display: Displays the integrated value of the detected shot count.
This integrated value is reset to zero at the following timings.
・ When the app is started
・ When returning to the startup screen and resetting the flash on / off
Help button: Displays a simple help screen.